I was interested in using the unusual webcam setup of my Dell XPS 13 9370 notebook for some personal projects. The Dell XPS 13 9370 does not only have a regular color camera but also an infrared camera. On Windows the infrared camera and the color camera are used for Windows Hello, which allows the user to secure his PC using facial authentication (Howdy is the closest equivalent for Linux). But when I tried to access my infrared camera using tools like fswebcam or installing Howdy I ran into several issues.
It turns out that the infrared camera of the Dell XPS 13 9370 uses an unusual 8-bit infrared video format called L8_IR (see this GitHub Issue for Howdy). This format is currently not supported by the driver in Ubuntu 18.04, but it was added to the linux kernel 4.19 (see the commit here) and that kernel version is expected to then be available on Ubuntu 19.04. That's good to know, but I still wanted to find a way to make use of the infrared camera on Ubuntu 18.04.
Following an approach similar to NSchrading on Stack Overflow I tried to make sense of the raw data produced by the infrared camera using the following fswebcam command:
LD_PRELOAD=/usr/lib/x86_64-linux-gnu/libv4l/v4l1compat.so fswebcam --palette GREY --device RAW:/dev/video1 --no-banner --no-timestamp --resolution "340x340" --dumpframe ir.raw
The command contains many optional arguments, so I will briefly break down what the individual arguments do:
LD_PRELOADprovides the absolute path to the Video4Linux library on my system, which has to be preloaded forfswebcamto correctly read from the raw video source of the infrared camera. You might have to change this path if Video4Linux is stored somewhere else on your system (see this comment on how to find the v4l1compat.so).--palette GREYis the closest palette format supported byfswebcamto L8_IR.--device RAW:/dev/video1specifies that we are reading the raw video data provided by the infrared camera, the color camera is found at/dev/video0.--no-banner --no-timestampremove the default banner added byfswebcam.--resolution "340x340"defines the image resolution of the infrared camera, which is specified here by Dell.--dumpframespecifies that we want to dump the raw frame to a file.
So running this command gives us an ir.raw file. You can also notice that the infrared emitters light up red when taking an infrared image.
Most programs cannot view .raw files, for this I wrote a quick script to validate if we are actually downloading a valid 8-bit infrared image. This blog post by a Linux driver developer for camera devices explains very well how the different color formats for Video4Linux2 are defined using the fourcc coding mechanism. The fornat for our 8-bit infrared format is V4L_PIX_FMT_GREY. So one byte describes the grayscale value for the given pixel. With this knowledge and knowing the output resolution of the infrared camera, we can write the following script to display the infrared image using matplotlib:
import matplotlib.pyplot as plt
import numpy as np
%matplotlib inline

grays = np.zeros((340,340),dtype=int)

with open('ir.raw', 'r+b') as f:
    for i in range(340):
        for j in range(340):
            val = f.read(1)
            pixel = int.from_bytes(val, byteorder='big')
            grays[i,j] = pixel

plt.imshow(grays, cmap='gray')
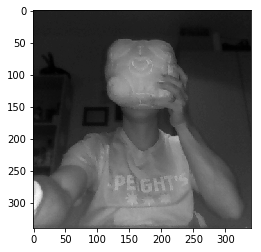
Here is an example image produced by my infrared camera:
So it took quite a bit to get to this point, but now we have the tools to implement some interesting Computer Vision applications using the stereo image setup of the Dell XPS 13 9370. I hope this is useful for other Dell users trying to get started with the built-in infrared camera.